
This article is a compilation of the information and knowledge that I have accumulated over the past three years from shooting live concerts, being a part of live events, reading numerous articles and observing other professionals practice their craft.If there are any experts out there who would like to correct any errors or add more information, you’re very much welcome to do so in the comments! Sharing is caring!

Most of us start off small. If you’ve ever seen behind-the-scenes photos of live events the scale of perhaps, the Grammys or the Oscars, you would often see dozens, if not hundreds, of crew members operating huge broadcast cameras linked via wireless transmitters to video villages (large video control centres) where more technicians mix video feeds for the live broadcast you see on your television. This, my fellow filmmaking enthusiasts, is what we call “The Very Big Budget Multi-Camera Production That We Probably Can’t Afford In The Near Future”. However, very often, we don’t really need a budget the size of that to pull off a professionally done coverage of a live concert. (Of course, we all aspire to reach that level one day.) What I want to write about in this article is the professional multi-camera production (MCP) that us small-to-medium productions are capable of pulling off. In fact, this could also be done by students in schools, provided that you have an acute sense of organization and attention to detail.
The Equipment
Most of us tech geeks tend to get overworked on having the biggest and most bad-ass equipment until reality hits us in the face and we’re reminded of how much money we actually have in our bank accounts. (Remember that you’re doing these live concerts to get more money!) Therefore, use the equipment that is most suited for the task at hand. Always rent if you don’t plan on using them very often!
1) DSLR/Mirrorless Cameras
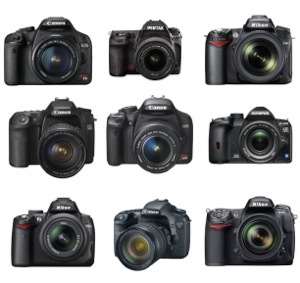
You can use any DSLR that has a video function. DSLRs would give you much more cinematic video than video camcorders because of the ability to use interchangeable lenses which means you can use lenses with a shallow depth-of-field (more bokeh!). They are also affordable, light, and you can buy more batteries easily. However, since DSLRs have recording time limits, choose models that have longer recording times (20mins, 30mins, etc.). I have also observed that certain cheaper DSLR models tend to overheat easily after an hour or two of continuous recording so beware of this issue when filming in warmer conditions. The recording time limit and overheating will become an issue if you’re trying to produce a continuous non-stop recording of a concert. To overcome this, you can either use multiple cameras that begin recording at different times or get 1-2 video cameras that can record without stopping. The mirrorless GH4 is the most affordable camera that would be suitable for this purpose. You can also always rent video cameras.
2) Tripods/Cranes/Dollies

It is absolutely important that you have a sturdy tripod with a fluid video head. Most of the time you will be using long telephoto lenses to shoot close ups of the action on stage and if you’re tripod is shaky, your going to end up with really shaky footage. If you have a bigger budget, go for cranes and dollies and they’ll help you to get shots from angles you wouldn’t be able to get on a tripod.
3) Audio Equipment

Some people get awesome footage but tend to neglect the quality of their audio. For that reason, I highly recommend you record the output of the PA mixer. You can do so by connecting the output to the XLR audio inputs of your camera (if your camera has them), using an audio recorder such as the Zoom H1, H4n, H5 and H6 or even direct USB output from the mixer if it is supported. There is no other way to get cleaner audio from a concert. When recording from a mixer, make sure you set your levels so that the audio doesn’t clip. It is better to set lower levels and boost them up in post than having your whole audio file rendered useless by clipping. Certain models such as the H6 have safeguards against clipping and will record a separate duplicate track at 12dB lower than your set gain so that you have a backup. You may also want to have good mics on your cameras and a few audience mics planted around to add to your mix later.
Setting Up
Always be prepared beforehand and make sure you get a copy of the program schedule from the organizer. If possible, ask for technical breakdown sheets that detail specific audio and lighting cues so that you’re able to plan your shots accordingly. You must always have a general idea of what type of shots you want to get so write it down on a shot list for easy reference.
Attend the rehearsal of the concert as it is the closest resemblance to the actual day concert. Here, you will be able to practice your framing, note down important cues, test different angles and adjust your camera settings. Find the opportunity to make friends with the sound guy so that he’ll help you with your audio recording of the mixer output. Always make friends with everyone because you’ll never know whose help you might need during the event!

When setting up your tripod, you should ensure that your camera is not blocked by the audience nor is it blocking the audience. Check with the organizers if it’s okay to put your camera in a particular location and whether it is possible to block off the immediate area as the last thing you’ll need is people tripping over your tripod and knocking your expensive camera down. Get your tripod set up as high above the audience as possible because people might get excited during the performance and stand up or jump which might block your camera. In my high school, we used wooden platforms to elevate the tripod.
In most concert halls, things will get really dark once the show starts so you have take the opportunity during the rehearsal to memorize the layout of the hall to know where to walk and where to pan to on the stage.
It’s probably also a good idea to liaise with the organizers regarding a secure storage location for your camera bags and additional equipment. You will also need a plug points for your chargers near where your camera is positioned (if you don’t have a considerably large number of spare batteries) so that you can pop new batteries into your camera then run to the charger and pop the old batteries into the charger. This way you can literally survive on just two batteries throughout a three hour show.
The Concert
When you step into the hall you have to remember the three most important things you’ll need for the day: 1) Chill (lots of it), 2) Agility, 3) Good Communication.
Before the concert starts, remember to roll your audio and triple check the levels. Make sure your audio recorder has fresh batteries. Then, make sure each camera operator is at their respective stations and that each camera has fresh batteries and a fresh memory card (Make sure there’s enough memory to last the whole show!). Brief all camera operators on their coverage zones and your general shot list. Depending on how many cameras you have, you should first make sure that each camera is covering a separate section of the stage. This is to ensure you have full coverage of all the action and that you don’t miss anything. Always have a wide shot. ALWAYS. The video camera that can record continuously for 3 hours should be your wide shot. This is your safety shot to fall back on if anything goes wrong or you miss something. If you have a fairly large number of cameras, after ensuring you have full coverage, you can then have multiple cameras pointing at the same thing to get different angles.
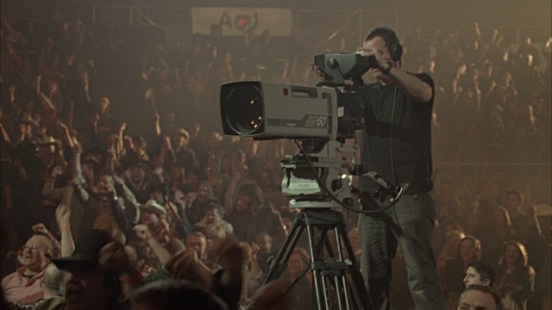
Talk to your crew throughout the show. Coordinate with fellow team members on which angles you’re taking and which angles they should take. If you spot an unexpected change of events, notify everyone. If you’re using a video mixer for live feed, the director will be responsible for calling out the camera shots over the radio. “Ready 1. Take 1. Ready 4. Take 4. Ready 2. Take 2.” Below: The amazing Louis J. Horvitz directing the 2015 Grammy Awards.
You should use two-way radios (walkie-talkies) with earpieces/headsets to communicate with your crew. The headset part is important because you won’t be able to hear your walkie-talkie over all the music nor will you get the opportunity to actually grab your walkie from your belt and press the button because your hands should be busy operating your camera. Get walkies of good and clear sound quality that don’t interfere with the other frequencies operating in the concert venue. For a low budget option, I suggest the Baofeng BF-888S walkies which you can get for MYR60 a piece on eBay. If you prefer a more durable and professional setup, get Motorola ones, such as the CP1300 or GP328 which are around MYR850 and MYR1200 respectively on Lelong.
Remember to be ready for the action. If a performer starts walking down the stage into the audience seating area, remember to get a camera to follow that. No matter how much you prepare, there will be some unexpected issue that crops up such as cameras dying, missed cues or lighting changes. It is important to not panic and be quick-witted to think of a solution. Get other cameras to cover you if necessary.
Post-Concert
Congratulations! You’ve survived three hours of stress and tension! Now it’s time for you to break down your set up and pack up your equipment. Before you started the day, you should have had an inventory of all the equipment you brought. Remember to retrieve all of them as soon as possible after the show and do not leave them lying around. Thank your team members and other concert crew for their help during the concert. Remember to unplug your audio recorder and cables from the mixer. After you have retrieved all of your equipment, start offloading your footage and audio into a separate hard disk so that you have two copies of the same thing. (Some productions like to make more than two copies.) Backing up to cloud storage is also another good option if you have a reliable and fast internet connection.

After you get home and you’re ready to start editing, remember to sync your footages with the audio first! I recommend using PluralEyes because it makes your life so much easier. Cut together your video using the software of your choice. Programs such as Adobe Premiere Pro allow you to slot in footage from multiple cameras and then mix it down by pressing buttons on your keyboard just like how you would mix a live feed on a video mixer.
I hope the information in this super long article has been helpful to those who are new to shooting live concerts. Ask me in the comments if you have any questions! Happy shooting!
SEAN NG.
